Docker as Python development evironment
We've all been there: you pull a teammate's branch, run pip install, and everything breaks. It could be a missing system library, a conflict between C-extensions, or a slight mismatch in Python versions. This is the "Works on My Machine" paradox—a productivity killer that turns "quick fixes" into lengthy sessions of environment debugging.
This article is based on Patrick Loeber's youtube video where he demonstrates that Docker isn't just a "shipping" tool. When used correctly, it becomes the ultimate local development environment. By moving your workflow into containers, you not only solve deployment issues but also eliminate environmental drift entirely.
Docker is an Operating System, Not Just a Package Manager
Many Python developers view virtual environments (venv or conda) as a cure-all. While they isolate Python packages, they don't capture system-level dependencies like ffmpeg, libpq, or specific gcc versions that your application needs. Docker is superior because it encapsulates the entire Linux OS, preventing your host machine from being "polluted" with project-specific system tools. As Patrick Loeber points out: "Docker is much more than a virtual environment. It’s essentially a complete Linux operating system. You can quickly test different Python versions. For instance, when the latest 3.11 was released, I used Docker to pull the latest image from Docker Hub, quickly set it up, and test it."
Hands-on Setup: The "Hello World" FastAPI App
Before we containerize, let's establish a clean project structure. This ensures our Docker mappings are precise.
Project Structure:
.
├── Dockerfile
├── requirements.txt
└── src/
    └── main.py
Step 1: Define Dependencies (requirements.txt)
fastapi
uvicorn
Step 2: The Boilerplate App (src/main.py)
from fastapi import FastAPI

app = FastAPI()

@app.get("/")
def read_root():
    return {"Hello": "World"}
Step 3: The Dockerfile We’ll use the python:3.10-slim image to keep our footprint small without sacrificing functionality.
FROM python:3.10-slim

WORKDIR /code

# Copy and install requirements first to leverage Docker's layer caching
COPY requirements.txt .
RUN pip install --no-cache-dir -r requirements.txt

# Copy the source code
COPY ./src ./src

# Use 0.0.0.0 to allow the container to be reachable from the host machine
CMD ["uvicorn", "src.main:app", "--host", "0.0.0.0", "--port", "80", "--reload"]
Pro-Tip: We use --no-cache-dir in the pip install step to keep the image size lean, a standard practice for senior-level DX.
Master the "Hot Reload" with Docker Volumes
The main challenge for Docker beginners is the build loop. "Do I need to rebuild the image every time I change a variable?" If you're not using Volumes, then yes. But with Volumes, definitely not. Volumes establish a live connection between your local folder and the container's file system. When you save a file in your IDE, the change is immediately reflected inside the container. Thanks to the --reload flag in our Uvicorn command, the server will "hot-swap" the code as soon as you hit Ctrl+S. To get this running, use the -v flag:
\( docker run -d --name fast-api-container -p 80:80 -v \)(pwd):/code fast-api-image
The "Aha!" Moment: This volume replaces the /code directory inside the container with your local directory during runtime. This setup combines the speed of local development with the ideal isolation of a container.
Your IDE Belongs Inside the Container
If you run your code in a container but keep your IDE pointed at your local Python interpreter, you’ll suffer from "broken intellisense"—those red squiggles under imports because your host machine doesn't have the libraries installed.
To fix this, you need to run a VS Code Server inside the container. Here is the professional setup for VS Code:
1. Install Extensions: Get the "Docker" and "Dev Containers" extensions.
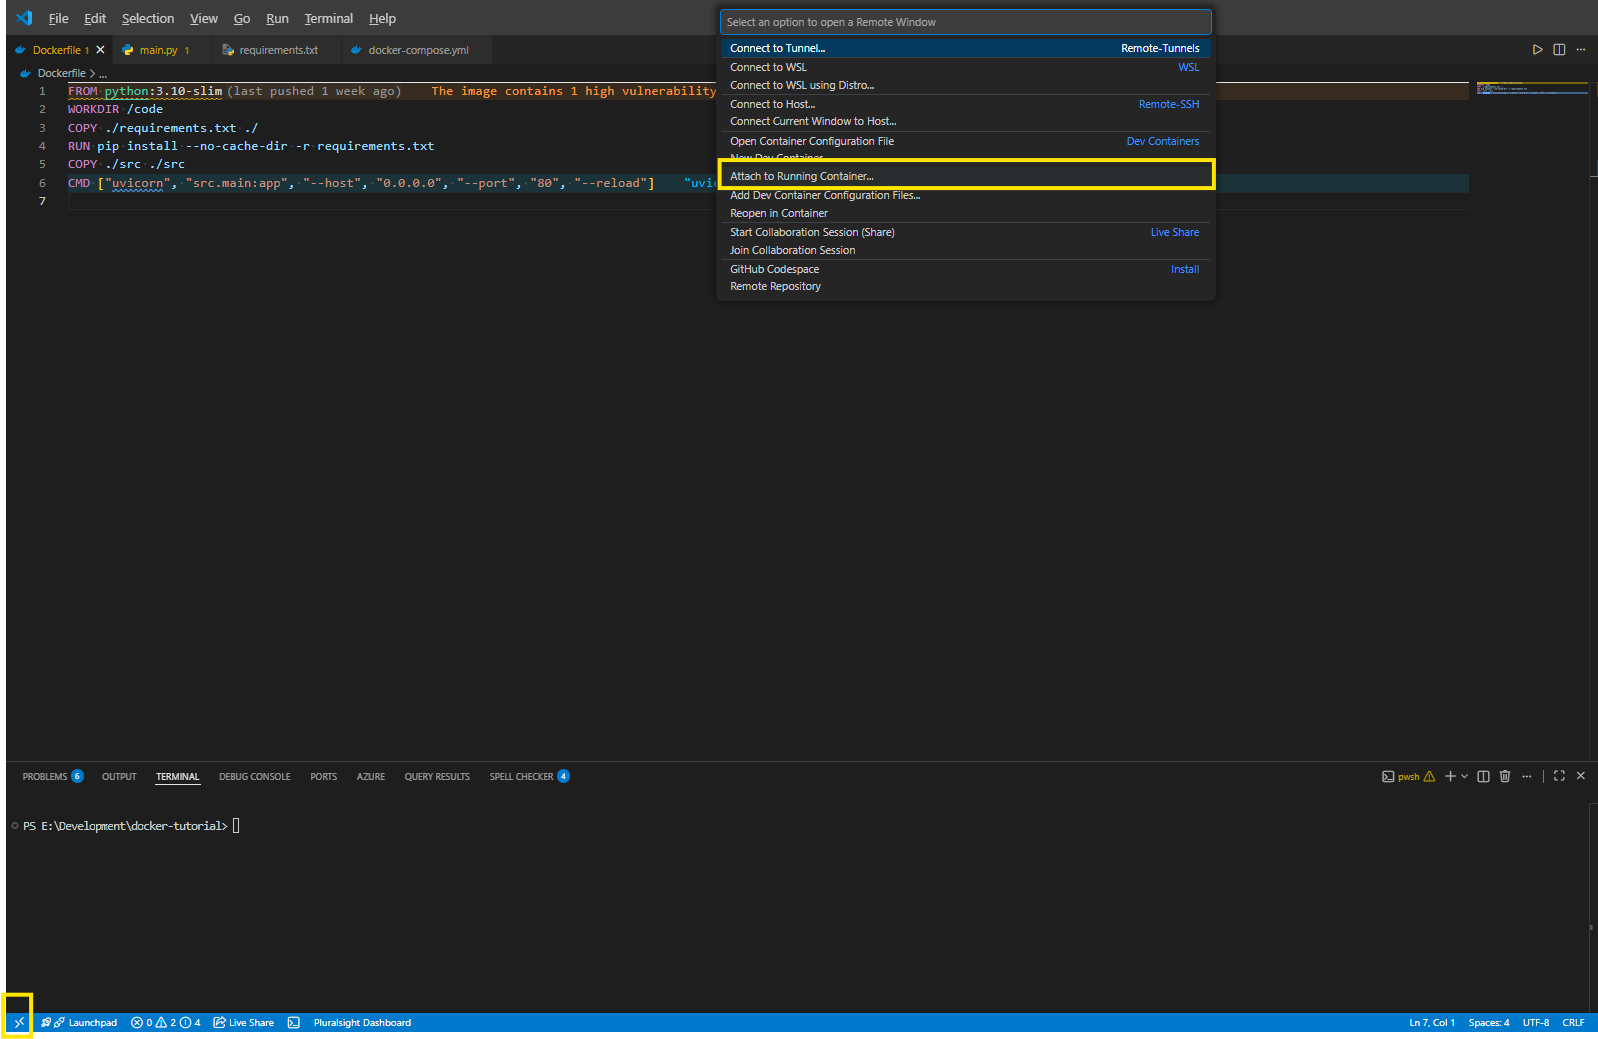
2. Attach to Container: Make sure your container is running, click the green icon in the bottom-left corner of VS Code, and choose "Attach to Running Container."
3. The Critical Step: When the new window opens, re-install the Python extension within the container context.
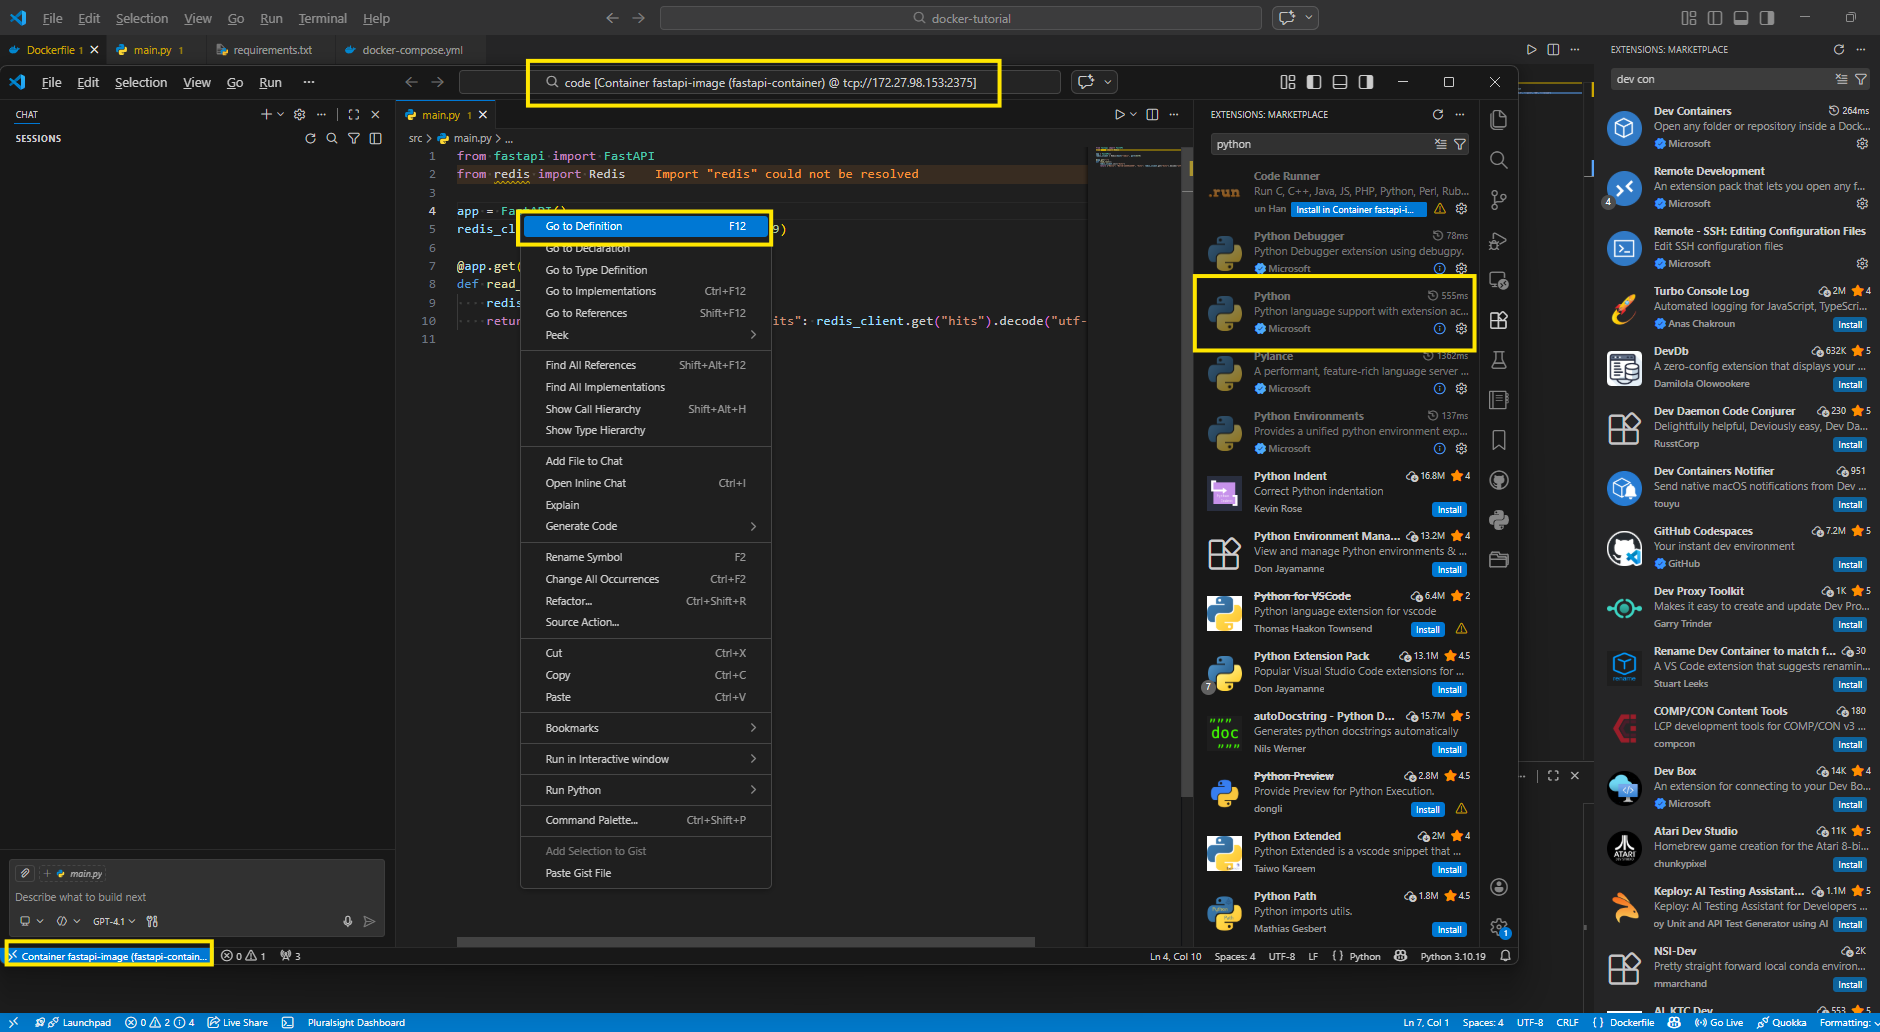
This establishes a connection where your IDE recognizes the container's interpreter and libraries, providing flawless autocompletion and "Go to Definition" support without needing to install any libraries on your system.
The Magic of "One-Command" Architecture with Docker Compose
Running individual docker run commands is fine for a single script, but real apps have dependencies like databases and caches. Docker Compose allows you to orchestrate your entire stack with a single YAML file.
Let's scale our app by adding Redis. First, update your requirements.txt to include redis. Then, create a docker-compose.yaml:
fastapi
uvicorn
redis
version: '3.8'
services:
  app:
    build: .
    container_name: python-server
    volumes:
      - .:/code
    ports:
      - "80:80"
    depends_on:
      - redis
  redis:
    image: "redis:alpine"
from fastapi import FastAPI
from redis import Redis

app = FastAPI()
redis_client = Redis(host="redis", port=6379)

@app.get("/")
def read_root():
    redis_client.incr("hits")
    return {"Hello": "World-1234512345", "hits": redis_client.get("hits").decode("utf-8")}
Now, instead of juggling multiple terminal tabs, you simply run:
docker compose up --build -d
Docker Compose handles the networking, ensuring your Python app can reach the Redis service simply by using the hostname redis.
Yes, You Can (and Should) Debug in a Container
The most common excuse for avoiding Docker is: "I can't use my debugger." That is a myth. By using the debugpy library, you can hook your IDE directly into the containerized process.
Step 1: Setup Add debugpy to your requirements.txt and map port 5678 in your docker-compose.yaml.
fastapi
uvicorn
redis
debugpy
Step 2: Inject the Listener In your main.py, add the following listener:
import debugpy

# Listen on 0.0.0.0 so the host can connect
debugpy.listen(("0.0.0.0", 5678))
Step 3: Configure VS Code (launch.json) Create a file at .vscode/launch.json with this "Remote Attach" configuration:
{
    "version": "0.2.0",
    "configurations": [
        {
            "name": "Python: Remote Attach",
            "type": "python",
            "request": "attach",
            "connect": {
                "host": "localhost",
                "port": 5678
            },
            "pathMappings": [
                {
                    "localRoot": "${workspaceFolder}",
                    "remoteRoot": "/code"
                }
            ]
        }
    ]
}
Now, set a breakpoint, hit F5, and your IDE will trap the execution inside the container. You can inspect variables and step through code exactly as if it were running natively.
References:
https://www.youtube.com/watch?v=0H2miBK_gAk&list=TLGGjs72sP30nYgyMDAyMjAyNg